
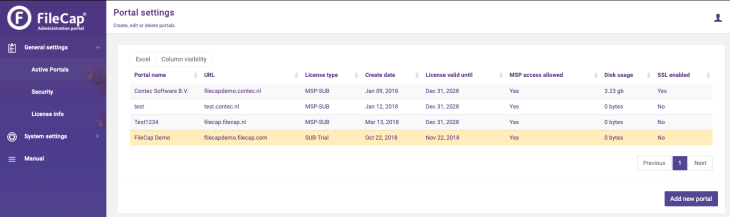
This menu option is only available to MSP admins and also the default view when a MSP admin logged in. This screen shows a list with all FileCap portals which are in use at the FileCap server.
It is also showing:
- Portal name
- URL
- License type
- MSP-SUB
This is a payed FileCap license. - SUB-Trial
This is a free 30 day trial license, portals running this license are marked with the color yellow. This license can be changed in a payed FileCap license (MSP-SUB) at any moment.
- MSP-SUB
- Create date
- License start date
- License valid until
- Renewing/changing a license is possible by the MSP reseller by clicking the portal and use the “License info”-button.
- MSP access allowed
- Disk usage
- Disk quota
- Max transfer size
- SSL enabled
Adding a new portal
When in “Active portals” and you click on “Add new portal” you can add a new Portal with the following screen:

| Portal name | Enter the portal name. For example, the Company name. |
| Portal URL (FQDN) | Enter the FQDN which will be used for this FileCap portal (Example: filecap.customer.com) |
| Disk quota (GB) | Enter the number of gigabytes (GB) this portal can use to store transfers
Note: You can use 0 (zero) for Unlimited |
| Max transfer size (MB) | Enter the number of megabytes (MB) to specify the maximum transfer size for one transfer.
Note: You can use 0 (zero) for Unlimited |
When the portal is added, you get a confirmation with the automatically created user with access to this portal.
By default all newly created portals will get the “SUB-Trial” license type, this is a free 30-day trial. During or after the trial period the license can be switched to a payed license by editing the portal.
Options for an existing portal
When in the “Active portals” screen you can click on a existing portal and see three buttons:
License info
Here you can see the current license information for the selected portal.

It is also possible to:
Refresh license
When the license is changed in the central license server and it is not visible in the license info screen, you can refresh the license with this button to get the newest license information from the central license server.
Change/request license

Note: With a trial portal this button is called “Request license”, with an already payed license the button is called “Change license”.
With this button you can request a new (payed) FileCap license, or change the current license to extend it with more users or years.
When doing this you will also change a trial license (SUB-Trial) to a payed license (MSP-SUB). The reseller running the MSP FileCap server will get an invoice for the used licenses.
Edit Portal
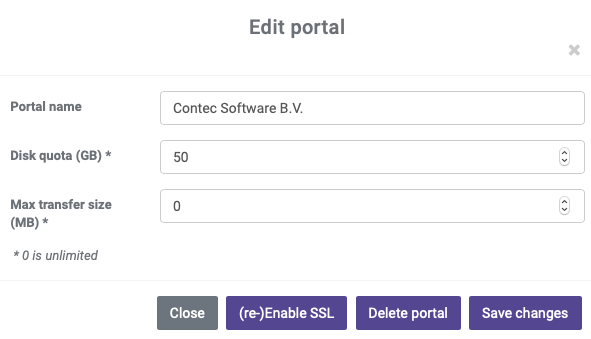
Here you have different options for the selected portal:
- Change the portal name
- This will change the Portal name and is just for the reseller for correct identification in the “Active Portals” list.
- Change Disk quota settings (in gigabytes)
- Change Max transfer size (in megabytes)
- (re-)Enable SSL
- Enable SSL for this portal by requesting a certificate using Let’s Encrypt. See also: “TLS certificate requirements“.
- Delete Portal
- This will delete the selected portal and all data which is sent using this portal will also be deleted. Deleting needs to be confirmed by typing the portal URL.
Open administration portal
Login to the selected portal as “MSP user”, this is only possible when “MSP Access allowed” is Yes (Yes is the default). End-users can change this option to restrict access for the MSP reseller.

You must be logged in to post a comment.